
Color Grading: A Love Story
Color: one of the many moving parts of video production. If you know how to use it, it can be the piece of the puzzle that takes a project from amateur to professional. Do you want the video to look true to life? Do some color correction. Do you want your project to be stylized? Add a color grade to it. There are so many possibilities that it is arguably the most intimidating part of the video production process, at least for me. Color can be such a powerful tool in any video project. Psychologically, color can change the way people feel at certain moments. There is so much to think about rather than just “making it look good”. Sure, that is a big part of it, but color means so much more than that. Sidenote: before we begin, I wanted to specify that I am writing this with the assumption that you have a very basic understanding of video production and color grading. If not, you may have to look up some of the terminology I use.
Color grading has always been very frustrating for me. I know how I want something to look, but I often don’t know how to get it there. In the early days of Element, we knew that our color grades were bad. We knew we needed to get better. Here's an example of our color grading in the early days.

Out of camera

…After color grading
Figures 1 & 2: …yeah...looks like we didn't touch it right? The worst part is...we did. Ignore the composition and all of the other issues in this shot, and focus on the color. All we did was take out a little bit of the green in the shot. And that’s it…we just didn’t know enough to make the image look better...
This was from a project we did as a baby company way back in the archaic age of 2015. At this point we were only a couple of recent college graduates making it up as we went. Granted, we didn’t have the best cameras or the best color grading software, but with the tools we had, we still could’ve made a great image. This just looks amateur.
Of course, over the years, with more experience and a drive to learn, we have gotten a lot better. We're still not color grading experts and still have a lot we want to learn, but we've come a long way. Below are side-by-side examples of some of our more recent work.
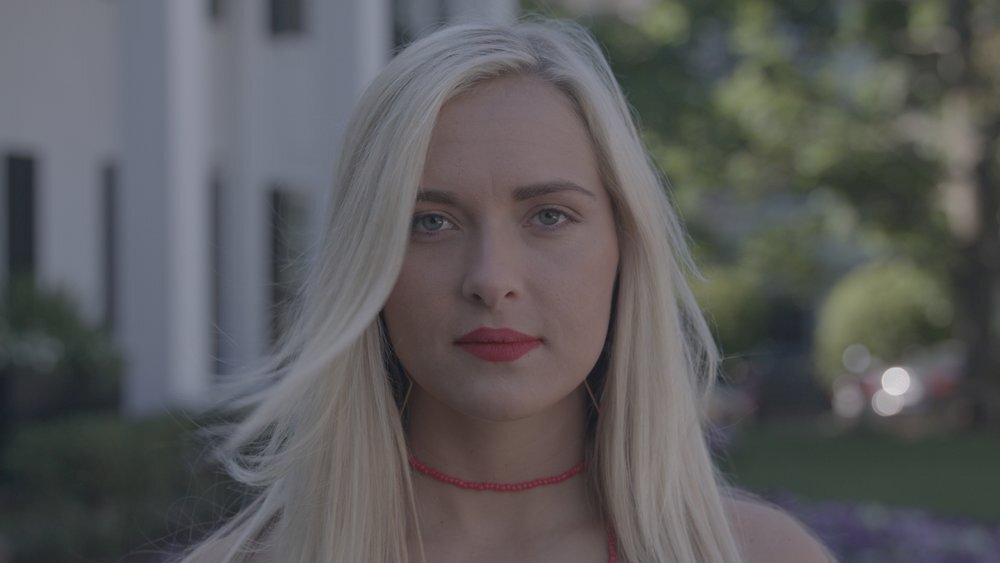


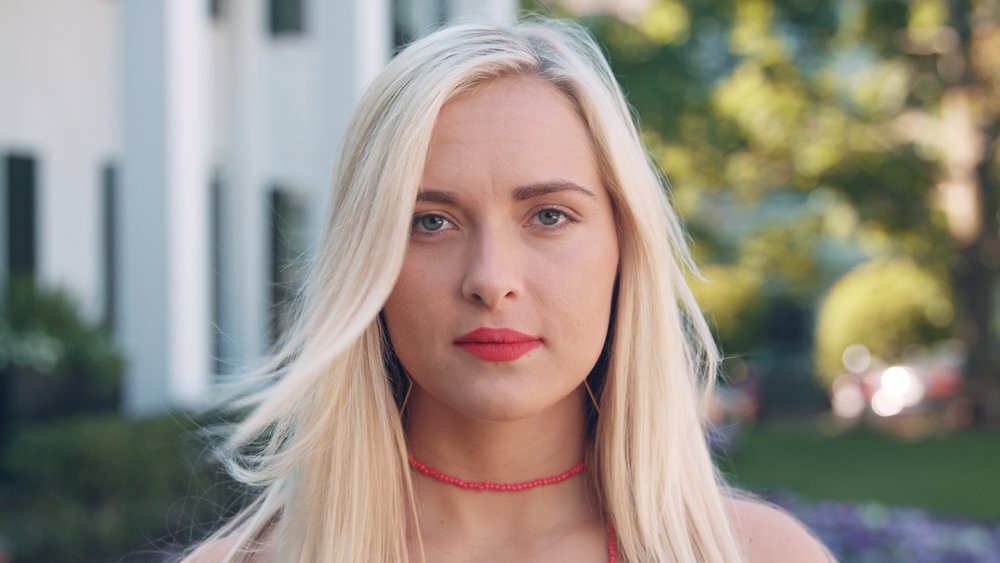


Figures 3-8: Definitely better, right? Personally, I'm still not quite satisfied. But hey, baby steps.
So, what did we learn to bring us to where we are now? First of all, we learned how to use our gear better. Dialing in our camera settings (and lighting) before we record saves us SO much time color grading. On most projects, we use log, or custom picture profiles to give us the most dynamic range and overall color grading freedom. It's also crucial to make sure the white balance and exposure settings are correct. Unless you're shooting in RAW, you can only do so much to fix these after the fact. The more you do on set, the easier it will be to get the look you want in the final product.
Another thing I personally learned, is that it's ok to get some help. For so long, I tried to do every color grade 100% manually, and was never satisfied with the results. After a while I started researching different LUTs and plugins (like FilmConvert) to help me along. This was a big turning point in the quality of our grades. Now, don't misunderstand me. We don't just pop on a LUT and call it a day (that rarely ever works). LUTs (or plugins) are just starting points in our process. For example, I'm really bad at manually creating grades that have really nice skin tones and cinematic blues in them without it looking weird or ruining all of the other colors. I can get some parts of the image to look right, but I can never seem to get everything just right. So I choose a LUT that I know does well with skin tones and blues. Usually it looks pretty bad at first, but once I tweak and dial in some other layers and settings, I can get a grade that I'm happy with. So, I use LUTs to get me going in the right direction, and then spend my time perfecting the grade.
While not essential, there are some tools that make color grading a lot easier. The best one is to have a good camera. Now, It's never a good idea to rely on a nice camera bailing you out (you still need to get a dialed in image on set). However, it is nice to have SO MANY OPTIONS in post-production. After starting with DSLRs and a Canon C100 Mk. II, we've moved up to cameras like the Arri Alexa Mini and the Red Epic-W. As you would expect, there is so much more freedom in post-production with these cameras (especially shooting in RAW...wow). But you don't have to have these cameras to make great content (In fact, not a single one of the above stills was shot on Arri or RED). A nice camera will definitely make color grading easier and give you more control, but you still have to know what you're doing. For that reason, it's always better to work your way up. Know how to grade footage from a Canon T3i before you try to grade footage from a RED Epic-W. Just my two cents.
Another tool we use is Davinci Resolve, which enhances the color grading process by a lot, once you get the hang of it (we also just got one of the Blackmagic panels and it's pretty great). Resolve was pretty hard for me to get used to, but it was worth it for the amount of control it gives you over the images.
Overall, we've done a lot over the past couple of years to grow in our color grading skills. On top of everything I've talked about, we've watched countless hours of tutorials, participated in workshops, etc, etc, etc. And like I said, I'm still not satisfied. But that's the fun part isn't it? Where's the fun in perfection? I hope to never stop learning.
-Trevor Davis


Kyle discusses three ways that different cameras have their own personalities, and how they can inform your decisions about what to film on.